

Carved pumpkins Hello Kitty style have become a beloved fall tradition that combines seasonal charm with adorable character art. As Halloween approaches, more people are discovering the joy of creating these unique decorations that stand out from typical jack-o’-lanterns. The importance of this trend goes beyond simple crafting—it brings families together, encourages creativity, and adds a touch of whimsy to autumn celebrations. Hello Kitty’s timeless appeal makes these carved pumpkins perfect for all ages, from children who love the character to adults who appreciate nostalgic touches. Unlike standard pumpkin carving that often focuses on scary faces, Hello Kitty designs offer a friendly, approachable alternative that can brighten any porch or indoor space. The process of creating these carvings helps develop fine motor skills and artistic expression while providing quality bonding time. With social media platforms overflowing with inspiration, carved pumpkins Hello Kitty have evolved from niche projects to mainstream Halloween staples that spread positivity and cuteness during the spooky season. This trend demonstrates how pop culture can enhance traditional activities, making them more engaging and personalized for modern households.
Essential Tools for Carved Pumpkins Hello Kitty
Creating perfect carved pumpkins Hello Kitty requires the right tools to achieve clean lines and detailed features. Start with a sturdy carving kit that includes serrated saws for cutting through thick pumpkin skin, scoops for removing seeds and pulp, and precision tools for intricate details like Hello Kitty's bow and whiskers. A key item is a pumpkin carving stencil—you can find free Hello Kitty templates online or create your own by printing and tracing the design. For safety, always use tools specifically designed for pumpkin carving rather than kitchen knives, which can slip easily. Choose a fresh pumpkin with smooth, unblemished skin for easier carving; larger pumpkins work better for detailed Hello Kitty faces. Consider using LED tea lights instead of real candles to prevent fire hazards and make your creation last longer. Having a damp cloth handy helps clean sticky residue while working. Many craft stores sell Hello Kitty-themed carving kits that include pre-made stencils, making the process accessible for beginners. Proper tool maintenance, like sharpening blades between uses, ensures smooth cuts. With these essentials, your carved pumpkins Hello Kitty will turn out professional-looking and durable throughout the Halloween season. For more DIY tips, check out this guide from Better Homes & Gardens on pumpkin carving techniques.
Step-by-Step Guide to Carved Pumpkins Hello Kitty
Follow this simple guide to create stunning carved pumpkins Hello Kitty that will impress your neighbors. First, wash and dry your pumpkin to remove dirt. Cut a circular hole around the stem at the top—angle your knife inward so the lid doesn't fall inside when replaced. Scoop out all seeds and stringy pulp using a robust scraper; save the seeds for roasting if desired. Next, select your Hello Kitty stencil and tape it securely to the pumpkin's flattest side. Use a poker tool to punch small holes along the design lines, transferring the pattern onto the pumpkin skin. Remove the stencil and carve along the dotted lines with a small saw, starting from the center and working outward for stability. Focus on key features like Hello Kitty's oval head, round eyes, and signature bow—take your time with delicate areas. For added dimension, consider shaving the pumpkin skin instead of cutting all the way through in some spots to create lighter shades. Once carving is complete, place an LED light inside and test the illumination. If any sections are too thin, reinforce them with toothpicks from the inside. Your carved pumpkins Hello Kitty can last up to a week if kept in a cool, dry place. For creative variations, explore other Sanrio characters on https://wheelsofflavor.com/sanrio-halloween-ideas.
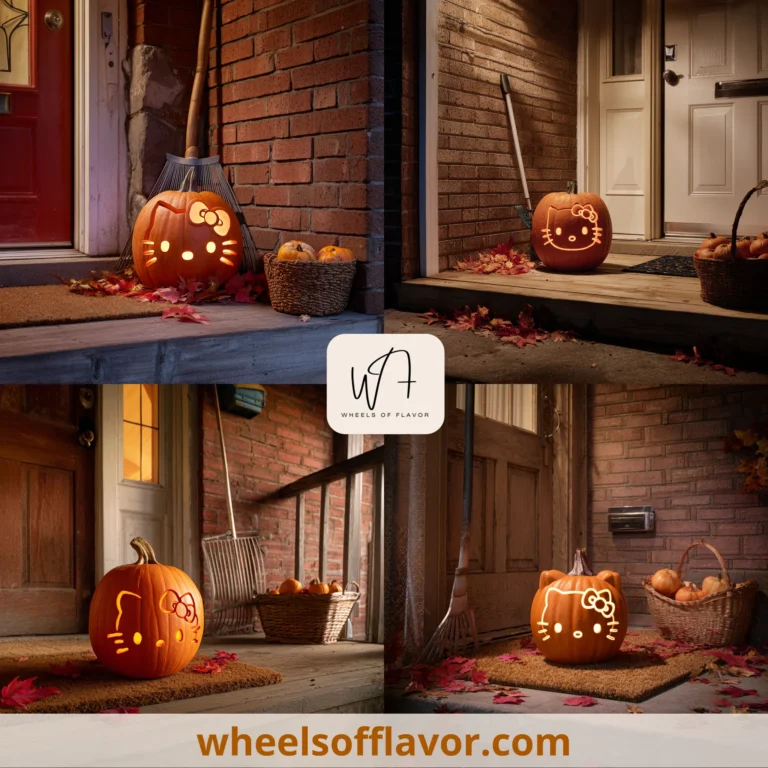
Creative Display Ideas for Carved Pumpkins Hello Kitty
Displaying your carved pumpkins Hello Kitty creatively enhances their charm and integrates them into your home decor. Cluster multiple Hello Kitty pumpkins of different sizes on your porch steps for a welcoming entryway—add miniature pumpkins with simple bow carvings alongside the main piece. For indoor use, place them on a fireplace mantel or dining table as a centerpiece, surrounded by fall leaves and fairy lights. To highlight the carving at night, use colored LED lights inside; pink or yellow bulbs complement Hello Kitty's cheerful aesthetic. Consider a themed display by pairing your pumpkin with Hello Kitty figurines or black cat decorations for a cohesive look. If weather is a concern, protect your creation by placing it under a covered area or using a clear sealant spray to delay rotting. For parties, create a 'Hello Kitty Pumpkin Patch' corner with hay bales and themed snacks. Photograph your carved pumpkins Hello Kitty in soft daylight to capture details for social media sharing. Rotate the pumpkin periodically to show off all angles if placed in a high-traffic area. These displays not only celebrate Halloween but also extend the festive spirit throughout autumn. Remember to keep displays away from pets or high moisture to maintain their appearance.
Conclusion
Carved pumpkins Hello Kitty offer a delightful twist on Halloween traditions, blending seasonal fun with iconic character art. Throughout this article, we've explored the tools, steps, and display ideas that make this DIY project accessible and enjoyable for all skill levels. These creations foster creativity, family bonding, and a positive approach to holiday decorating. As trends evolve, we can expect to see more innovations like glow-in-the-dark carvings or integrated smart lights that bring Hello Kitty to life in new ways. The future of carved pumpkins Hello Kitty looks bright, with online communities sharing patterns and tips to inspire global participation. To keep your skills sharp, practice on smaller pumpkins before attempting complex designs and experiment with mixed media like paint for accents. Embrace this trend as a yearly ritual that adds warmth and personality to your autumn celebrations. Whether you're a seasoned crafter or a beginner, the joy of seeing Hello Kitty's friendly face glowing on a pumpkin is unmatched. Start planning your project today to spread happiness this Halloween season.
Frequently Asked Questions
Q: How long do carved pumpkins Hello Kitty typically last?
Carved pumpkins Hello Kitty usually last 5 to 10 days, depending on weather conditions. To extend their life, keep them in a cool, dry place when not on display, and avoid direct sunlight or rain. Using a bleach solution (1 tablespoon bleach per gallon of water) to spray the inside can slow down mold growth. LED lights instead of candles also help prevent overheating and dehydration.
Q: Can I use artificial pumpkins for Hello Kitty carvings?
Yes, artificial pumpkins made from foam or plastic are excellent alternatives for Hello Kitty carvings. They are reusable, weather-resistant, and easier to carve with standard tools. You can find pre-colored pink or white artificial pumpkins that suit Hello Kitty's theme perfectly. These are ideal for long-term decor or if you want to preserve your creation for multiple seasons.
Q: Where can I find free Hello Kitty stencils for pumpkin carving?
Free Hello Kitty stencils are widely available online on websites like Pinterest, Sanrio's official site, or crafting blogs. Search for 'Hello Kitty pumpkin stencil printable' to find simple to intricate designs. You can also create your own by printing a Hello Kitty image and tracing it onto the pumpkin with a marker. For unique ideas, visit https://wheelsofflavor.com/halloween-stencils for a collection of seasonal templates.