

Imagine stepping into your backyard to the aroma of grilled delicacies, prepared in your very own outdoor kitchen. Not just any kitchen, but one you built with your hands, using repurposed pallets. This isn’t just about saving money; it’s about creating a space that reflects your creativity and passion for DIY projects. Outdoor kitchen DIY pallets projects are gaining popularity for their affordability, sustainability, and the unique charm they add to outdoor living spaces. Whether you’re a seasoned DIY enthusiast or a beginner looking for a manageable project, building an outdoor kitchen with pallets offers endless possibilities to enhance your outdoor living experience. Let’s dive into how you can transform simple pallets into a functional and stylish outdoor kitchen.
Planning Your Outdoor Kitchen DIY Pallets Project
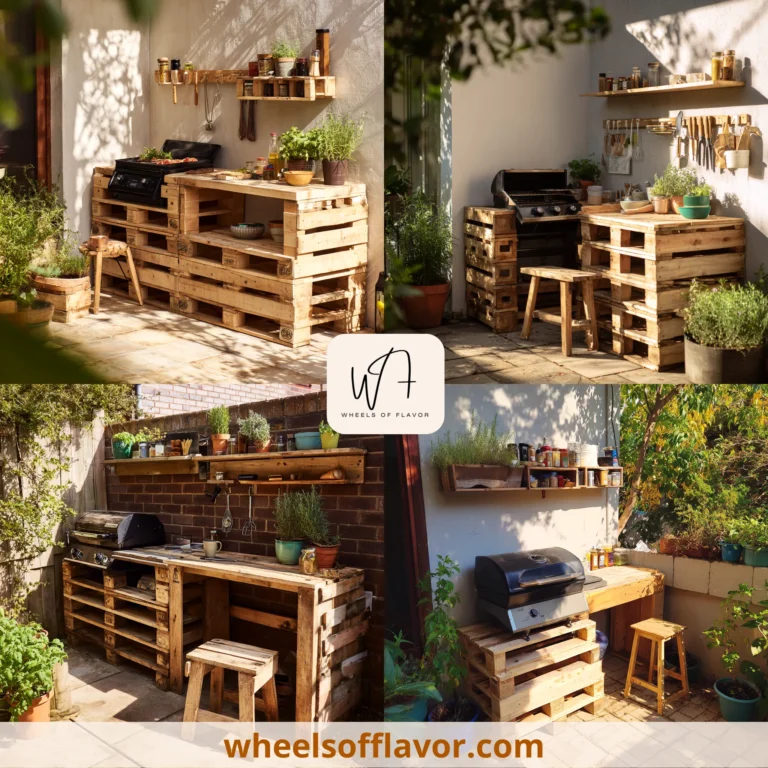
Before you start, it's crucial to plan your outdoor kitchen layout. Consider the space available, the number of pallets you'll need, and the tools required. Sketch a rough design of your kitchen, including areas for cooking, prep, and storage. Think about the placement of your grill or stove and how you'll integrate it with the pallet structure. Remember, pallets can be used not just for the base but also for creating shelves and countertops. This stage is all about creativity and functionality, ensuring your outdoor kitchen meets your needs and fits perfectly in your backyard space.
Building the Foundation: Outdoor Kitchen DIY Pallets Basics
The foundation of your outdoor kitchen is key to its durability and stability. Start by selecting sturdy pallets that can withstand outdoor conditions. Treat the wood to protect it from moisture and pests. Assemble the pallets to form the base of your kitchen, ensuring they're level and secure. You can add wheels for mobility or anchor them for a permanent setup. This step might require some basic carpentry skills, but with patience and the right tools, you can create a solid foundation for your outdoor kitchen. Remember, the strength of your foundation determines the longevity of your project.
Customizing Your Outdoor Kitchen DIY Pallets Setup
Now comes the fun part: customizing your outdoor kitchen. Use additional pallets to build shelves for storage or a countertop for food prep. You can stain or paint the wood to match your outdoor decor. Consider adding hooks for utensils, a small sink, or even a mini-fridge if space allows. The beauty of using pallets is the flexibility they offer; you can easily modify or expand your kitchen as needed. This is your chance to let your personality shine through in the design, making your outdoor kitchen truly one-of-a-kind.
Conclusion
Building an outdoor kitchen with pallets is not just a DIY project; it's a journey towards creating a more inviting and functional outdoor space. It proves that with a bit of creativity and effort, you can transform simple materials into something extraordinary. As you enjoy the fruits of your labor, remember that this project is also a step towards sustainable living, repurposing materials that might otherwise go to waste. We encourage you to share your outdoor kitchen DIY pallets project with others, inspiring more people to embark on their own DIY adventures. The possibilities are endless, and the satisfaction of cooking in a kitchen you built yourself is unparalleled.
Frequently Asked Questions
Q: How many pallets do I need for an outdoor kitchen?
The number of pallets depends on the size and design of your outdoor kitchen. A small kitchen might require 4-6 pallets, while a larger setup could need 10 or more. Plan your design first to estimate the quantity needed.
Q: Can pallet wood withstand outdoor conditions?
Yes, but it requires treatment. Use a sealant or outdoor paint to protect the wood from moisture, UV rays, and pests. Regular maintenance will also extend its lifespan.
Q: What tools do I need for a pallet outdoor kitchen?
Basic tools include a hammer, nails, a saw, a drill, and sandpaper. Depending on your design, you might also need a level, measuring tape, and possibly a sander for finishing touches.